Pages

Helpful Links

Thursday, December 22, 2011

Oracle BPM: Configuring BAM (Process Administrator and Database)

BAM is really necessary for reporting purposes. First of all we create the database for BAM in the External Resources section. Create two connection one for BAM and other for Datamart: Follow the following steps to make databases for BAM and database. First you can configure the BAM shown after the BAM picture.
  1. Login to the Process Admin with Admin Login that's made at the time of installation.
  2. Click on Process Monitoring on left and Click the BAM tab.
  3. Click on Manage Database
  4. Check the Create Database and Create Data structure options
  5. Give Database Administrator user and Password and Click OK.
BAM


After the Database is created we need  to configure it. In BAM confuration:

  1. Go to BAM Link on left inside Process Administror
  2. Click on Process Monitoring on left and Click the BAM tab.
  3. Click the Enable Automatic Update option. Select the External Database made for BAM.
  4. Give the Update Frequency in minutes. (This the periodic time after which the BAM is updated)
  5. Give the data Expiration time. (This is the time data is kept in BAM before deleting or moving it to Datamart).
  6. Save it.
Datamart and BAM settings
 Now the job is to install the process monitoring service.

Windows:
First set the JAVA_HOME environment variable. Right Click on My Computer-> Properties -> Advanced tab -> Click Environment Variable button. Now add a new system variable called JAVA_HOME. Give the path to <ORACLEBPM_HOME>/jre/bin.

Now Install the service using the script <ORABPM_HOME>/bin/oraclebpmwarehouse.bat install .
This installs the service for BAM. In the services a new service can be seen of the name Oracle BPM datawarehouse service default.

Linux:

Same as windows on terminal. The script is this: <ORABPM_HOME>/bin/oraclebpmwarehouse.sh start

Friday, December 16, 2011

Oracle BPM: Working with Buttons

In oracle BPM applying different codes or methods to the buttons is not straight forward as in some other applications. Different logics can be applied in the jsp (for which I will give a complete tutorial in a few days). For now for easy understanding I am using the presentations from the studio to apply logic and decisions to the buttons code, it can also be used for form validations and requirements fulfillment, easy to understand for people with web development background.

I have seen the Oracle tutorials about buttons and they have made a mess of it. Its really simple.

Now if you look at the following project:

Workflow
The workflow shows that when the product detail is entered by the Initiator. It goes the Head of Department (HoD) for approval. The HoD can simply approve and reject it based on the content. By default there are two buttons present in the presentation called submit and Cancel. We can remove them and add our own or edit them to function as we want them to.

First of all we need to make a new method in project-> Catalog -> Module -> right click your object -> New -> Method. Name your method like "submitApproval". In the method enter your logic as


//Any Logic
submit("Approvesubmit");

Save it.

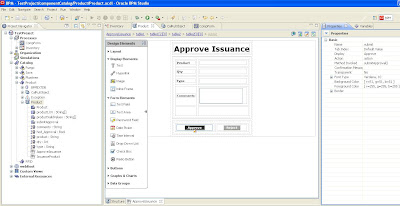
Following is the Approval Issuance form available to the HoD:

Approve Reject buttons
Please take not that Approve button is selected, you can see in the properties on the right that the Action is selected as action and Method Invoked is submitApproval() as defined earlier. Now this presentation is given to the Approve form interactive component call inside the screen-flow of the Approval activity.

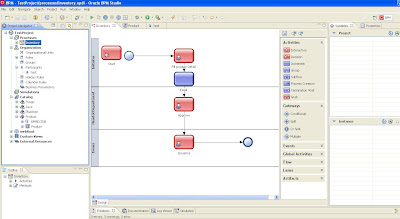
Approval screenflow

As shown in the figure above. Now add the logic of  result="Approvesubmit" in the conditional transition and logics are entered going out of the screenflow. In the automatic activities we can define logics about different actions as per our project. I have made simple attribute that says approval=true.

Whenever a submit button is clicked the value inside the submit("") method is assigned to the result variable. Result is a predefined variable of type string. For example if submit("me") is given in method. The result variable is result="me".

In the screenshot below we can see a new conditional transition from Approve activity to Fill product detail activity. In the case of Rejection this flow is followed. In the condition its simply written approval !=true.


Modified Screenflow


Please leave a comment for every question, query and suggestion


Thursday, December 8, 2011

Oracle BPM: Working with Exceptions

Like every project and application exceptions are really important. They make small mistakes in the project almost negligible, good exception handling tries to hide the bugs in the project. In Oracle BPM exception handling is covered and multiple ways are given to handle the exception that occur outside the normal flow. 4 types of exception are covered:
  1. System Exceptions
  2. Business Exceptions
  3. Code level Exception Handling
  4. Process level exception Handling
1. System level exception for hardware and software problems or unavailability. It is covered by BPM itself as it contains in component catalog -> java -> Lang -> Exception. An error or reason is given to end user.

2. Business Exceptions are generated by business rules. They are generated if some business rule is not met, for example the code below
if creditlimit > givenlimit then
   limitException as OverLimitException = OverlimitException()
   limitException.value  = creditlimit
   throw limitException 
end 
3.  Code level exceptions are handled at code level like
do
  // regular code 

on Exception
  // exception handling code

on exit
  // clean-up code (always executed)

end 
4. When an exception is not handled at code level it becomes a process level exception. It can be handled in flow like the flow given below.
 First add two interactive activities one for instance expiration and one for business exception:
Exception Handling
 Take note from the image given above. First a new instance variable called exception Holder is added of type:Any. Secondly, a business Exception is added under the currently used module of the name Exception by Right clicking on the module-> New-> Business Exception.


Right Click on any role and click Exception to then give the name of the activities you want the type of Exceptions to be handled. The business Exception from the flow above is a business exception that is thrown from Fill Product detail activity using the following code in method.

throw Product.Exception;

The exception is then catched by the Process Exception and the following properties are being entered inside the connector.

Exception Handling
 Now we reach the Exception Handling stage where inside the exception handling stage we can ask the end user how he/she wants to handle the exception. This stage can be handled using the presentation and methods. I have used the method that asks users how they want to handle the exception using the method. The choices are they want to abort(delete) the instance or they want to send the exception back to the activity where the exception occurs. The third choice is to hold the instance in the exception handling stage.


Exception Handling choices


Note: We don't always need to ask the end users for exception handling. Almost all of the exception handling can be done without user interaction. For Example in the case of Instance Expiration from the process deadline missed, this process exception can be sent back to the activity where the exception was generated by removing or extending the deadline.


Thursday, December 1, 2011

Oracle BPM: Using Global Activities

Global activities are an important feature of BPM used in almost every project. Global activities can be assigned to a role that is then applied to a participant (can be end user), so eventually all participants in the role can see the global activity. Global Activities are available to the user no matter what stage or role the activity is currently at. Global Activities can be used to run applications related to the project or some statistical data analysis, query the database, show any in-process or completed forms and reports and even email the users. It can also be use to delete and hold instances

Global activities can start a project instance and automatically process
  • process batch reports
  • download a set of files at a schedules time.
  • listen for an specific event in the process.
  • listen to a port.
  • check for specific events, such as a mouse-click or a broken connection error in a remote component.
  • invoke a component or application to create new process instances.
The task of a Global Interactive activity can have the following implementation types:
  • Method
  • Screen-flow
  • Show Workload
  • Show Dashboard
  • Edit Business Rules
Implementation types can be Method,Component, Screen-flow, Show Process Image, Display Instance, Variables (only if the property Use activity instance for presentation is selected) 
 
 The following is a demonstration of adding a global activity to show a form that is being completed, we have a project running. We added a new role swimlane and added a global interactive activity called ViewForm in it.


Add Global Interactive activity
We will give global activity the access in the properties as below:

Global Interactive Properties

 From the Global Interactive Main Task we select the implementation type as required in my case its screenflow with read only access.

Main Task
 
Add an interactive component call inside the screen-flow and the setting in the picture below can be used to display the form. As the screen flow is read-only no changes will be allowed on it. Its primary purpose is to be viewed by user with the role assigned at any stage of the process.

Presentation to be viewed
The following pic shows how Global Interactive Activity is visible to the end user. Under the select action -> under the Applications Heading.

Workspace showing Global Interactive Activity
Hope Global Interactive Activity is clear if there is any query or suggestion, please comment. 
I will give feedback asap

Wednesday, November 23, 2011

Oracle BPM: Working with project variables

There are four types of variables used in Oracle BPM.
  1. Project Variable
  2. Instance Variable
  3. Local Varaible
  4. Predefined
Project variables are really important, they are designed at the time of project design as they have links in Engine and BAM database as well as the Datamart and Archive database. They are really important as they are used at time of reporting. Project variables have many advantages:
  • Project variables are defined at project level to integrate with all processes
  • Project variable are present inside the engine database
  • They are visible to end users on their workspace
  • Workspace and Database searches and sorting can be performed through project variables
  • Same project variables can be reused in different projects
  • They can be used as business indicators that can be used in BAM and Datamart
  • Project variable are accessible from all activities and processes
Project variable have a limit of 256 variables per project.

Below is the way we can add project variables to a project. I am using the same project used in previous posts:
Original Process

Now we go to the projects tab on the right side of the screen, if it is not visible go to window -> Show view -> Click on variables
Now Click + icon and a new window appears:

Project Variables
The basic information should be entered then select the business indicator.

Now for all the project variables add them as per your project
Added PVs
Once the PVs have been added then click on the icons on top titled "Map as Incoming Argument" and "Map as Outgoing Argument". These will make the incoming and outgoing arguments for all the Variables. Now Double Click on Begin activity you can see all the defined variables and assign them the variables as per project requirements as shown:

Begin Activity
These PVs can be defined in any Activity outgoing process as well. After argument mapping you can add or update all PVs through all the activities. In the workspace it looks like this:

Workspace Showing 3 Added PVs at end
Keep reading and you are free to request any view or comment.

Thursday, November 17, 2011

Oracle BPM: Working with Deadlines, Calendar and Holiday Rules

Working with deadlines is the core of every tracking and time related process. Deadlines are really important for a project to be completed on time and additional resources are required if a project is lacking time. Good planning always involve using deadlines. In BPM also, Deadlines are given a lot of importance, if the deadlines are not met reminders can be generated for approval, moving forward, skipping activities and generating emails to the required participants a.k.a users.

There is a small problem that most of the industry and offices work in shifts and usually have one or two days off in a week, its an irony :), so calendar rules needed to be generated so that deadlines exist and expire in working time or when most of the staff are present on their desk. In addition to calendar rules we have also got both expected and unexpected holidays for example weekends, country national days, regional holidays like Religious festivals. The need is to include these holidays into our plan so that these holidays are not hurting the deadlines.

In the discussion below I will show how to use deadlines in a simple way with the integration of holiday and calendar rules. We start by using the simplest flow of inventory approval used in earlier post.

Simple WorkFlow

Now we want to add a deadline for the approval activity so that a reminder is generated after the deadline is passed. For example an email can be sent or if no activity is done in the deadline period it is reassigned to another participant.

Deadline Added on Approval activity

Check the swim line of Head of Department role, you can see a new automatic activity has been added with a due transition. In the due connector add the time of deadline.

Inside Due transition
This is the simplest way to add deadline. The variable entry is of interval type. Now see the workspace below showing 1 day deadline. Suppose we started the instance reached Approval Activity on Nov 17, 2011 and deadline is calculated after a day that is Nov 18, 2011.

 
Workspace showing deadline

Now we are going to add calendar and holiday rules and integrate them with deadlines.

Add Holiday Rule:
  1. Go to Organization, inside your project
  2. Right click Holiday Rules 
  3. New 
  4. Name it
  5. Then a new tab opens 
  6. Click Add 
  7. Add the Holiday you want for example suppose tomorrow Nov 18, 2011 is a holiday.
Add Calendar Rule:
  1. Go to Organization, inside your project
  2. Right click Calendar Rules
  3. New 
  4. Name it
  5. Then a new tab opens
  6. Add your companies shift timings or necessary information, I have given Saturday and Sunday as Holiday. See Figure Below
  7. Add Holiday Rule made earlier into the Calendar Rule and Save it.

Add Calendar Rules

Now go to project Navigator -> Select Your project -> Your Module -> Right Click Module -> New -> BPM Object -> In the Object Make a method called set Calendar Deadlines and a variable integer for number of days.As shown in the figure below:

Calendar Rule Code
This is code inside the method for calendar deadlines. Make sure the server side method is Yes and return type is Interval, As seen in the figure above save it

//Code for Calendar Rule

calendar as CalendarRule

calendar = CalendarRule.fetch(calendarName : "CRule")
start as Time
memday as Time
start = 'now'
memday = start
newdead as Time

count as Int
count = 0
numDays=1
numDays=numDays+1

if numDays> 0 then
    while count < numDays do
        if (isHoliday(calendar, time : start) == false &&
        isWorkDate(calendar, time : start) == true) then
            count = count + 1
        end
    start = start + '1d'
    end
start = start - '1d'
end
newdead=start


deadint as Interval
deadint=newdead-'now'
return deadint


Save Project. Go back to Due Activity -> Properties and write the code below Inside Due Transition.


PDProcess.CalRulOBject.setCalDeadlines(numDays:1)

<module>.<CalendarRuleObject>.<method>(variable:value)

Now if we calculate the new deadline like Nov 18, 2011 is holiday and Nov 19 and Nov 20 are weekly offs. The new deadline will be calculated to Nov 21, 2011. As show below.

Deadline Solution
 Looking forward to any queries, suggestions and questions. Leave a comment here or E-mail me with reference to this topic.

Best Regards


Thursday, November 10, 2011

Oracle BPM: Send Email to End Users

End user communication is really important for any project. In oracle bpm there is no direct way to send emails to End Users. It can be easily done from any automatic activity. We are gonna use the scenario below. The Email will be sent from initiator to the head of Department with the details of the issuance criteria.

Workflow
Now add an automatic activity below:

Automatic Activity
An Email will be sent whenever an instance passes this automatic activity. This activity is given Add the code below in the automatic activity as it requires some customization with regards to your own project. Notice that HTML syntax are being used. You can use all HTML syntax's to improve the style of your emails.


//Email Code Starts here

mydate as Time
dateString as String

mydate = 'now'
dateString = format(mydate, mask : "dd-MMM-yyyy")
reminderEmail as Mail
reminderEmail = Mail()
cc as String[]
bcc as String[]
bb as String[]
reminderEmail.from = "bpmadmin@example.com"
reminderEmail.recipient = "<target recipient>" + "<target recipient>"

bcc[] = "Administrator@example.com"
reminderEmail.subject = "Activity submitted at your end" + instance_variable.number
reminderEmail.contentType = "text/html;charset=UTF-8"
reminderEmail.message = "Dear User," +

"\nA new work has been submitted for your approval\n" +
"\n Product: " + instance_variable.product +
"\n qty: " + instance_variable.qty +
"\n type "+ instance_variable.type +
"\n Approval Deadline is: " + dateValue(Approval_Deadline) +
"Regards \n Administrator"
reminderEmail.cc = cc
reminderEmail.bcc = bcc
sender as MailSender
sender = MailSender(mail : reminderEmail)

send sender

After using this code you should be able to send E-mails to many participants.

One more thing, You have to add smtp settings. 

In studio:
  1. Go to project Navigator
  2. Right Click your project
  3.  Select Engine Preferences
  4. Select Engine -> General Tab
  5. In networking panel, give smtp server, port and admin Email.  
  6. Save your project 

In Enterprise Standalone:

  1. Go to Process Administrator
  2. Select Engines
  3. Click on your Engine
  4. Go to networking tab and enter your settings
  5. It requires smtp server, port, Admin Email, URL (The URL for End Users)
  6. Click Save and Apply